Web Interface
This page covers basic tasks in the GitLab service, purely through the web interface without requiring knowledge of Git. However, for more extensive work with a repository, it is recommended to edit the project locally.
Git itself is covered by our colleagues from the BI-GIT course in their Very Brief Git Overview.
Login
The service is available at https://gitlab.fit.cvut.cz/.
- Users with a CTU account – use the Usermap tab and log in with their CTU username and password.
- Users without a CTU account – use the Standard tab and log in using the credentials provided to them.

Working with a Project
Navigate to the desired project, for example using the search bar in the top menu.
Caution:
To edit a file, you must have the appropriate permissions for the given project. If you do not have the required permissions, contact the project owner.
Editing Files
Files can be edited in the following ways:
- Editing a single file
- For AsciiDoc or Markdown files, a preview of changes can be displayed before saving.
- Editing multiple files at once using the Web IDE
To edit a single file, follow these steps:
Navigate to the desired file.

Click Edit and select Edit single file from the menu.

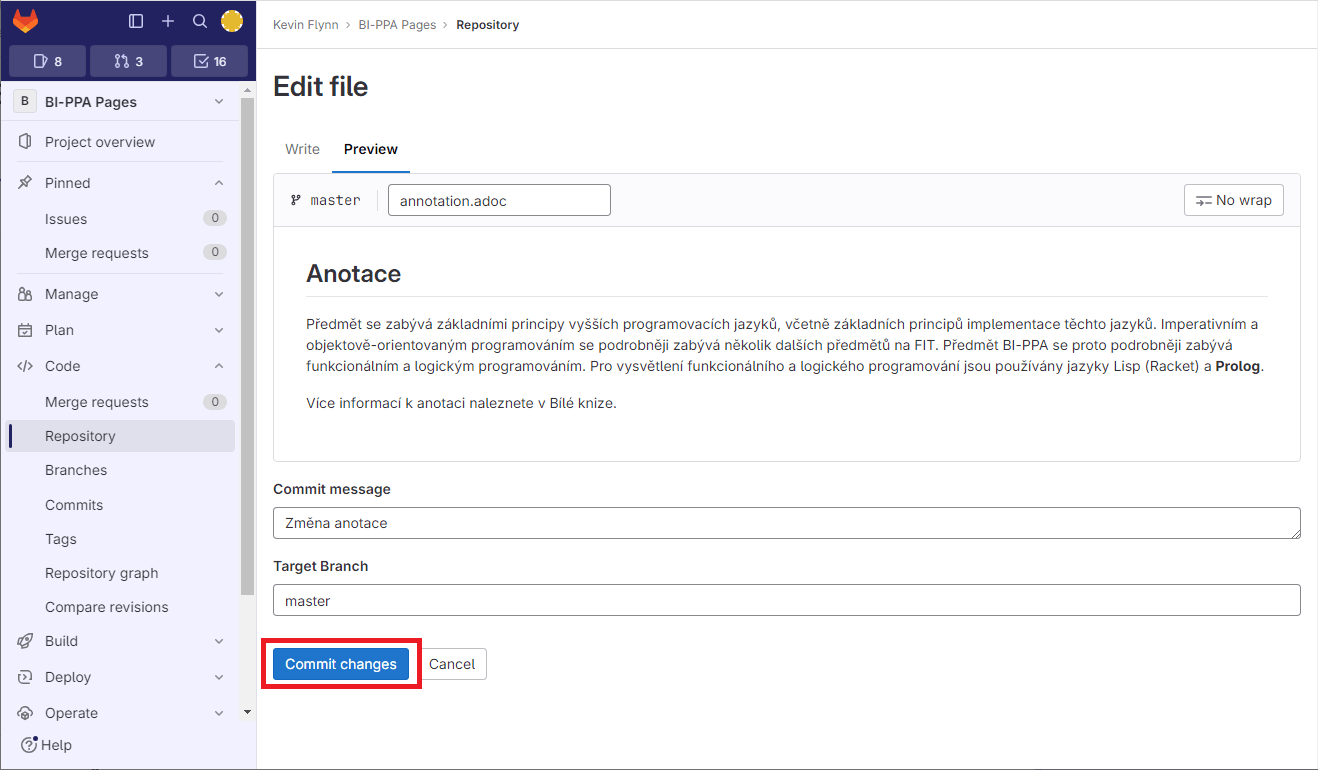
Make the desired changes. Alternatively, use Preview to view the result.

Fill in the Commit message (a brief description of the changes) and save using Commit changes.
Web IDE
The Web IDE allows you to edit multiple files within a single commit.
Caution:
The Web IDE does not provide a preview feature for AsciiDoc, Markdown, and similar file types before saving.
Click the Edit button at the top of the project page and launch the web editor by selecting Web IDE.

Working with the GitLab web editor is similar to working in any IDE. Open files for editing in the left panel — multiple files can be opened simultaneously.

Edit any files as needed. To save your changes, go to the Source Control section. Enter a brief description in the Commit message field and confirm by clicking Commit to <branch name> at the top of the page.

Uploading Files
Smaller files (e.g., PDFs, images) can be uploaded through the web interface.
- In the target repository, navigate to the location where you want to add the file.
Click the + button and select Upload file from the menu.

Select the desired file, enter a brief description of the changes, and click Upload file.

The file has been successfully uploaded.

Caution:
For larger files, it is strongly recommended to use Git Large File Storage (LFS) while working locally — this method is not available through the web interface.
Alternatively, it is recommended to use one of the secure storage services supported by the faculty. You can then simply provide a link to the file in your GitLab project.
One such storage service is Microsoft OneDrive.[1]
Creating an Issue
Any user with read access to a project can also create Issues within it.
These tickets are not only for reporting bugs; they also allow users to provide project owners with feedback, suggestions, or improvement ideas.
For example, students can provide feedback to instructors about a course website.
- To create an issue, navigate to the desired project, for example using the search bar in the top menu.
In the menu, go to Plan › Issues and click New issue.

Fill in the issue title and description. Attachments can be added, and the text formatting can be adjusted using the editor toolbar in the upper-left corner.
The following options are also available:
- Preview — available via the Preview tab.
Confidential issue — the issue can be created as confidential, making it visible only to project owners.

Click Create issue to create the issue.

Managing an Issue
Users with the Reporter role or higher can manage issues.
In the project menu, go to Plan › Issues and select the issue you want to handle.

In the issue details, you can comment on it, assign it to a colleague, or close it by clicking Close issue.

Example of issue handling.

Creating a Branch
A project can be branched — that is, separated from the main line of development so work can continue independently without affecting other branches.
Changes from a branch can later be merged back into the main branch (typically master).[2]
There are multiple ways to create a branch.[3] In general, a branch can be created as follows:
In the project menu, go to Code › Branches and click New branch.

- Fill in the following fields:
- Branch name — any branch name.
Create from — select an existing branch, commit, or tag from which the new branch will be created. To branch from the main branch, select
master.
- Continue by clicking Create branch.
Working in a Branch
You can freely switch between branches in the web interface.

You can then perform standard actions such as editing, uploading, deleting files, and more.
The currently active branch is displayed in the upper-left corner, as shown in the image.

Merge Request
A Merge Request (MR) is one way of merging one branch into another.
It allows you to conveniently:
- Compare changes with the target branch.
- Discuss individual changes with colleagues.
- Approve and merge the changes.
- Close or reject the request.
A Merge Request is required when you do not have permission to merge branches directly. The final merge (approval of the Merge Request) can only be performed by a user with the appropriate permissions.
To create a Merge Request for an existing branch:
In the project menu, go to Code › Branches and click New next to the desired branch.

Fill in the Title and Description fields. The branches to be merged can be changed using Change branches. You may also assign the request to an Assignee_[4] or a _Reviewer responsible for reviewing and approving the changes. Labels can also be assigned.
Then click Create merge request.

A list of open Merge Requests can be found in the project menu under Merge requests. Click the name of a Merge Request to view its details.

- The Overview, Commits, and Changes tabs provide a summary of the changes introduced by the Merge Request.
- Overview — a general overview allowing discussion about the proposed changes.
- Commits — a list of commits relative to the Target branch.
Changes — a clear visual diff against the target branch.

The Merge Request can be commented on throughout its lifetime. The ability to read or write comments depends on the user’s permissions.

- A project member with sufficient permissions may at any time:
- Reject the Merge Request using Close merge request.
Approve and merge the changes into the Target branch using Merge.

Setting the Default Branch
In some cases, it may be necessary to change the project’s default branch, for example to master.
Setting master as the default branch is recommended when publishing static websites using PagesFIT.
In the project menu, go to Settings › Repository.

In the Branch defaults section, select the new default branch from the Default branch field.

- Confirm by clicking Save changes.
Working with Groups
Creating groups is currently available only to staff members.
For more information about groups and course groups, see Groups.
Members
Only members with the Maintainer role or higher can add users to a group.
Caution:
For course groups, user membership is automatically synchronized based on KOS data. For more information, see Course Groups.
To manage members, navigate to Manage › Members within the project or group.

Users can be added, have their membership expiration date changed, have their role modified, and so on.
It is recommended to set an expiration date for membership, for example until the end of the following semester.
Creating a Subgroup
Go to the main page of the group and choose the option to create a new subgroup, as shown in the image.

Figure 2. Group detail page when creating a new subgroup or project. Fill in the required information and confirm with Create group.

Figure 3. Subgroup creation process.
- Microsoft OneDrive provides advanced access control and permission management features. ↩
- Changes can generally be merged into any other branch. ↩
- An alternative method is creating a branch from an existing issue. ↩
- Usually the person responsible for the changes and capable of performing the final merge. ↩